3D visualization helps transform drawings and specifications into a visual representation of the future project, from a residential building to an industrial facility. It reduces the risk of errors during approvals, accelerates decision-making, and improves communication between the client, architect, engineer, and contractor.
High-quality visualization is not a “pretty picture,” but a tool for controlling geometry, materials, lighting, environment, and usage scenarios. Below are rules and practical tips that help achieve realistic and convincing results without losing technical meaning.
Basic Rules of 3D Visualization
1) Start with the Goal and Audience
Determine who the result is intended for: the investor, future residents, the expert committee, the sales department, or the builders. Sales are driven by emotions and life scenarios; expert evaluation is driven by accuracy and verifiability; and builders are driven by the legibility of components and compliance with documentation.
2) Maintain scale, geometry, and model integrity
The model must correspond to the actual dimensions, levels, elevations, and fit on the arch visualisation. Errors in wall thickness, opening heights, or roof slopes often lead to incorrect expectations and additional rework costs.
- Work in the correct units of measurement and record them in the project.
- Check axes, levels, snaps, and collisions before the final render.
- Don’t “hide” problem areas with attractive angles: it’s better to fix them than to mask them.
3) Materials and lighting are more important than detailing everything.
Realism is most often built on believable materials (PBR textures) and correct lighting. Over-detailing details in low light and flat shaders doesn’t save the image.
- Use physically correct materials: reflection, roughness, normals.
- Maintain realistic values: gloss of tiles, matte of plaster, transparency of glass.
- Check white balance and exposure to avoid “killing” the texture.
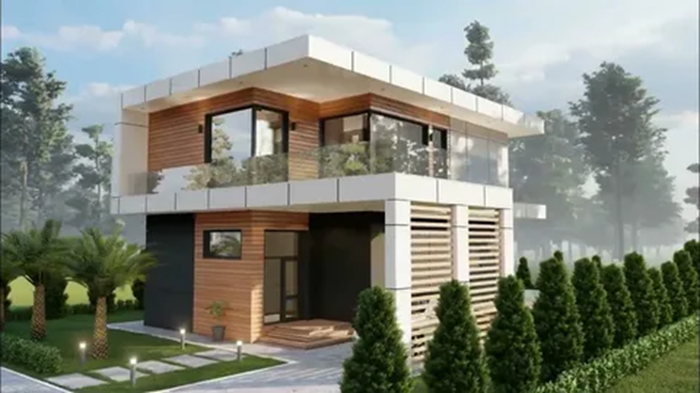
4) Camera and Composition: Present the Project Clearly
The right camera helps you assess volume, layout, and proportions. Distortions that are too wide make rooms appear larger than they are, and facades look unrealistic.
- For interiors, choose a moderate viewing angle to maintain geometry.
- For exteriors, show the building from human level and from above, if justified by the task.
- Follow a logical flow: entrance > public areas > private spaces.
Summary and checklist before submitting 3D visualizations
A high-quality result is achieved not by a “pretty picture,” but by following the rules: a clear goal, correct geometry and scale, realistic materials and lighting, a uniform presentation standard, as well as transparent communication and version control at every stage.
Final Review
- Purpose and Audience: Is the presentation appropriate for the task (sales, approval, expert review, work coordination).
- Model Accuracy: Dimensions, marks, references, collisions, repeating elements, and axes have been verified.
- Materials and Environment: Materials are consistent, textures are to scale, reflections are consistent, and joints are correct.
- Lighting and Cameras: No overexposure or dips, clear angles, perspective is maintained, and the composition is legible.
- Subject and Information Content: Key areas, nodes, entrance areas, landscaping, and important engineering elements (if required) are shown.
- Unified Style: Same render settings, color correction, fonts/symbols (if any), consistency across the series.
- Formats and Quality: As required Resolutions, correct image profiles, file names, and folder structure.
- Legal and source code: texture/model sources confirmed, assumptions noted, specification version documented.
- Record: final specification, list of assumptions, and list of issued materials.
- Check: model against checklist and approve control previews.
- Deliver: final renders/panoramas/animations and source files (if necessary) with clear project navigation.